Using Templates for Your Website with Dreamweaver MX
Download this tutorial in Microsoft Word format.
How to Make a Template
- Create a new page. NOTE: All Templates in this tutorial will be made with the layout tables
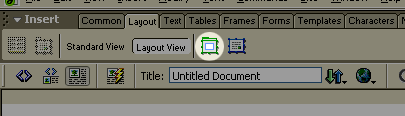
- At the top of the page where you see the common Objects Panel, click on the Layers tab.
- After selecting the Layout Tab, click on the words Layout View.
- The following image shows you where these two things are located:

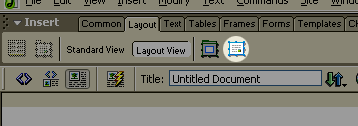
- Select the GREEN layout table button found to the right of the words Layout View. See the image below for help in locating the Green layout table button:
- After you have selected this tool, you can draw a table in the white space of your page.
- After you insert this main layout table, we need to begin inserting layout cells within the green table. These cells will hold the images and navigation bars that you would like to add to your template. They are simply drawn into the layout table with your mouse like you would draw the original green table. To locate the tool needed to add these cells see the image below:
- After you have inserted all of the cells you would like put into your page, you must save the page as a template.
- You can do this by going to FILE>SAVE AS TEMPLATE. The following will appear on your screen:

- This is where you name the template. Type the name in the SAVE AS box highlighted in the image above. Then click the SAVE button.
- After you save it as a template, you must include the EDITABLE REGION.
- The EDITABLE REGION is the most important part of your template. This is where all the information will go when you attach this template to a new page you are creating.
- To create the editable region, you need to create a layout cell in your template where you want the content to appear.
- After you have created this cell, click on the outside of it to highlight the entire cell.
- After the cell is highlighted, go up to the INSERT menu and then down to the TEMPLATE OBJECT option. Then choose EDITABLE REGION. The following will appear on your screen:

- Where it says NAME, enter the name of your new editable region. Usually “Body” or something like that is appropriate but any name will do. After you have entered a name click OK.
- That is the final touch to your new template. Save the template one more time.
- Now you can put whatever you like in the other regions of your template to make it your own! That is all that is needed to make your template!
How to Use your Template
After you have created a template, the next step is incorporating it into new pages. There are two ways to do this. One is by going starting with the template and adding info in the editable region, or the other is to create a new page, and then attach the template later.
Starting with the Template
- Go up to the FILE menu and select NEW. The following will appear:
- Notice the highlighted Template tab at the top of this menu. Click on that tab. Then you will see the following menu:
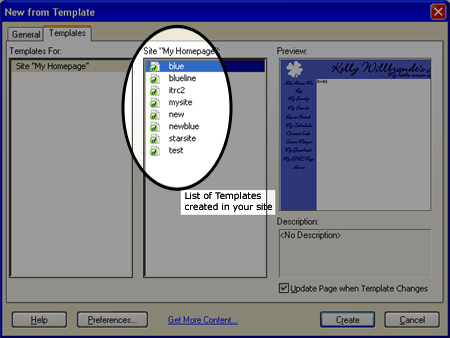
- The highlighted area is the list of templates saved in your WWW folder. Select the template you want to use and click CREATE.
- Then, you will see a page come up with your template incorporated already, and the cell with the editable region that you named when creating the template.
- Put your cursor into the editable region box, and begin entering the content for your page. NOTE: Notice that as you enter the content, a light-teal colored box appears around the text and there is a tag on it that says the name of the region (in my example it says Body). This box only appears in Dreamweaver and does not appear when viewing the page on the web.
- After you enter the content into the editable region, save your page as you would normally and you are finished.
Attaching Templates to New Pages
This is a great way to change pages when they are already created. If you have already created a website and would like to change the layout by adding a template, this is the easiest way to do it!
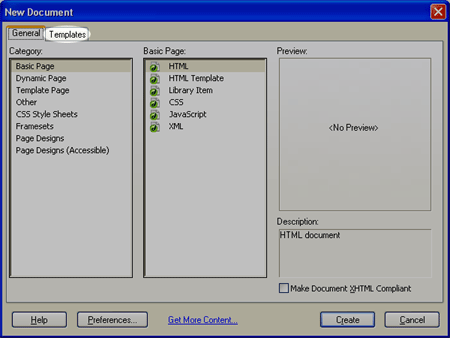
- Go up to file and select NEW.
- A menu will appear on your screen. Make sure the GENERAL tab is marked as in the following image:
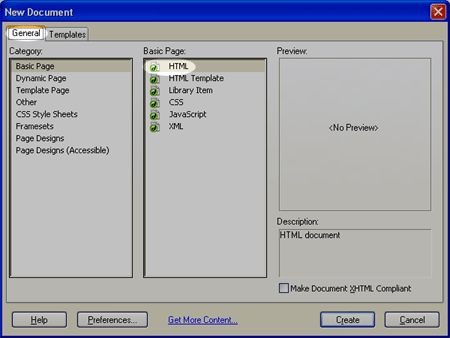
- Select Basic Page in the menu to the extreme left, and to the menu next to it select HTML. Then hit the CREATE button at the bottom right of the screen.
- Insert the content onto the page as you would like it to appear within your editable region of your template. Do not worry about spacing quite yet, as it will change a little when you attach the template.
- After you have entered all your content, save the page in the normal way.
- Now, go up to MODIFY, then down to TEMPLATES and choose the APPLY TEMPLATE TO PAGE option. The following will appear on your screen:
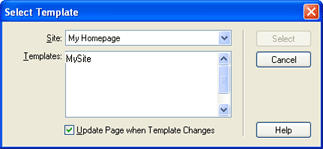
- Select the template that you have created that you wish to apply to the page.
- After you select the template, press on the SELECT button to the right of the menu, and the template will attach to the page.
- Then the following will appear:
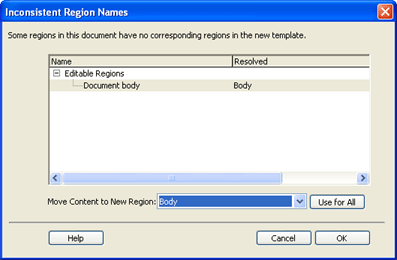
- Be sure to have the Document Body phrase selected under the editable regions section of the menu. Then, where it says Move Content to New Regions scroll down and select Body or whatever name you named your editable region.
- Now select the OK option at the bottom right of the menu. Now the template is attached and should appear on your screen.
- After the template is attached you can finish formatting your text or images that are in the editable regions to make them more aesthetically pleasing to you.
How to Make Changes to Your Template
- To make changes to your template, simply go FILE>OPEN and go into the TEMPLATES folder that was created when you saved the template.
- Select the template you wish to make changes to, and make the desired changes.
- When finished, save the template. When you save the template the following will appear on your screen:
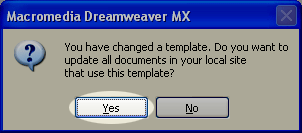
- Select YES. Dreamweaver will then scan your site and update all pages connected to the template. Then the following will appear:
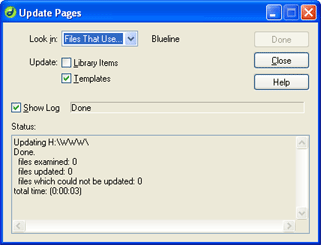
- This shows the files that were attached to the template you just saved and that they were updated. Click the CLOSE button to the upper right and you have finished updating your template and pages.